So far we’ve been using the
glDrawArrays function for all our rendering. OpenGL ES
offers another way of kicking off a sequence of triangles (or lines or
points) through the use of the glDrawElements function.
It has much the same effect as glDrawArrays, but
instead of simply plowing forward through the vertex list, it first reads
a list of indices from an index buffer and then uses
those indices to choose vertices from the vertex buffer. Here’s one way of
rendering the square with glDrawArrays:
vec2 vertices[6] = { vec2(0, 0), vec2(0, 1), vec2(1, 1),
                     vec2(1, 1), vec2(1, 0), vec2(0, 0) };
glVertexPointer(2, GL_FLOAT, sizeof(vec2), (void*) vertices);
glDrawArrays(GL_TRIANGLES, 0, 6);
Note that two vertices—(0, 0) and (1, 1)—appear
twice in the vertex list. Vertex indexing can eliminate this redundancy.
Here’s how:
vec2 vertices[4] = { vec2(0, 0), vec2(0, 1), vec2(1, 1), vec2(1, 0) };
GLubyte indices[6] = { 0, 1, 2, 2, 3, 0};
glVertexPointer(2, GL_FLOAT, sizeof(vec2), vertices);
glDrawElements(GL_TRIANGLES, 6, GL_UNSIGNED_BYTE, (void*) indices);
So, instead of sending 6 vertices to OpenGL (8
bytes per vertex), we’re now sending 4 vertices plus 6 indices (one byte
per index). That’s a total of 48 bytes with glDrawArrays and 38 bytes with
glDrawIndices.
You might be thinking “But I can just use a
triangle strip with glDrawArrays and save just as much
memory!” That’s true in this case. In fact, a triangle strip is the best
way to draw our lonely little square:
vec2 vertices[6] = { vec2(0, 0), vec2(0, 1), vec2(1, 0), vec2(1, 1) };
glVertexPointer(2, GL_FLOAT, sizeof(vec2), (void*) vertices);
glDrawArrays(GL_TRIANGLE_STRIP, 0, 4);
That’s only 48 bytes, and adding an index
buffer would buy us nothing.
However, more complex geometry (such as our
cone model) usually involves even more repetition of vertices, so an index
buffer offers much better savings. Moreover, GL_TRIANGLE_STRIP is great in certain
cases, but in general it isn’t as versatile as GL_TRIANGLES. With
GL_TRIANGLES, a single draw call can be used to render
multiple disjoint pieces of geometry. To achieve best performance with
OpenGL, execute as few draw calls per frame as possible.
Let’s walk through the process of updating
Touch Cone to use indexing. Take a look at these two lines in the class
declaration of RenderingEngine1:
vector<Vertex> m_cone;
vector<Vertex> m_disk;
Indexing allows you to combine these two
arrays, but it also requires a new array for holding the indices. OpenGL
ES supports two types of indices: GLushort (16 bit) and
GLubyte (8 bit). In this case, there are fewer than 256
vertices, so you can use GLubyte for best efficiency.
Replace those two lines with the following:
vector<Vertex> m_coneVertices;
vector<GLubyte> m_coneIndices;
GLuint m_bodyIndexCount;
GLuint m_diskIndexCount;
Since the index buffer is partitioned into two
parts (body and disk), we also added some counts that will get passed to
glDrawElements, as you’ll see later.
Next you need to update the code that generates
the geometry. With indexing, the number of required vertices for our cone
shape is n*2+1, where n is the
number of slices. There are n vertices at the apex,
another n vertices at the rim, and one vertex for the
center of the base. Example 1 shows
how to generate the vertices. This code goes inside the
Initialize method of the rendering engine class; before
you insert it, delete everything between m_pivotPoint =
ivec2(width / 2, height / 2); and // Create the depth
buffer.
Example 1. Vertex generation
const float coneRadius = 0.5f;
const float coneHeight = 1.866f;
const int coneSlices = 40;
const float dtheta = TwoPi / coneSlices;
const int vertexCount = coneSlices * 2 + 1;

m_coneVertices.resize(vertexCount);
vector<Vertex>::iterator vertex = m_coneVertices.begin();

// Cone's body
for (float theta = 0; vertex != m_coneVertices.end() - 1; theta += dtheta) {

    // Grayscale gradient
    float brightness = abs(sin(theta));
    vec4 color(brightness, brightness, brightness, 1);

    // Apex vertex
    vertex->Position = vec3(0, 1, 0);
    vertex->Color = color;
    vertex++;

    // Rim vertex
    vertex->Position.x = coneRadius * cos(theta);
    vertex->Position.y = 1 - coneHeight;
    vertex->Position.z = coneRadius * sin(theta);
    vertex->Color = color;
    vertex++;
}

// Disk center
vertex->Position = vec3(0, 1 - coneHeight, 0);
vertex->Color = vec4(1, 1, 1, 1);
|
In addition to the vertices, you need to store
indices for 2n triangles, which requires a total of
6n indices.
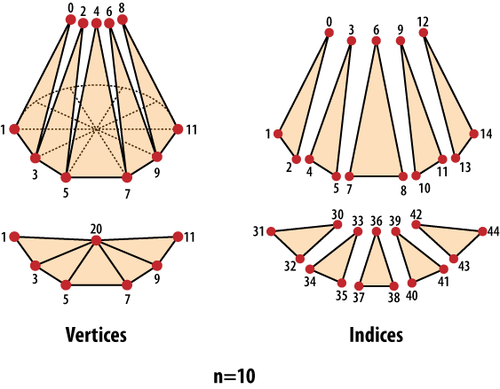
Figure 1
uses exploded views to show the tessellation of a cone with n =
10. The image on the left depicts the ordering of the vertex
buffer; the image on the right depicts the ordering of the index buffer.
Note that each vertex at the rim is shared between four different
triangles; that’s the power of indexing! Remember, the vertices at the
apex cannot be shared because each of those vertices requires a unique
color attribute.
Example 2
shows the code for generating indices (again, this code lives in our
Initialize method). Note the usage
of the modulo operator to wrap the indices back to the start of the
array.
Example 2. Index generation
m_bodyIndexCount = coneSlices * 3;
m_diskIndexCount = coneSlices * 3;

m_coneIndices.resize(m_bodyIndexCount + m_diskIndexCount);
vector<GLubyte>::iterator index = m_coneIndices.begin();

// Body triangles
for (int i = 0; i < coneSlices * 2; i += 2) {
    *index++ = i;
    *index++ = (i + 1) % (2 * coneSlices);
    *index++ = (i + 3) % (2 * coneSlices);
}

// Disk triangles
const int diskCenterIndex = vertexCount - 1;
for (int i = 1; i < coneSlices * 2 + 1; i += 2) {
    *index++ = diskCenterIndex;
    *index++ = i;
    *index++ = (i + 2) % (2 * coneSlices);
}
|
Now it’s time to enter the new
Render() method, shown in Example 3. Take a close look at the core of the
rendering calls (in bold). Recall that the body of the cone has a
grayscale gradient, but the cap is solid white. The
draw call that renders the body should heed the color
values specified in the vertex array, but the draw call for the disk
should not. So, between the two calls to
glDrawElements, the GL_COLOR_ARRAY
attribute is turned off with glDisableClientState, and
the color is explicitly set with glColor4f. Replace the
definition of Render() in its entirety with the code in
Example 3.
Example 3. RenderingEngine1::Render()
void RenderingEngine1::Render() const
{
    GLsizei stride = sizeof(Vertex);
    const GLvoid* pCoords = &m_coneVertices[0].Position.x;
    const GLvoid* pColors = &m_coneVertices[0].Color.x;

    glClearColor(0.5f, 0.5f, 0.5f, 1);
    glClear(GL_COLOR_BUFFER_BIT | GL_DEPTH_BUFFER_BIT);
    glPushMatrix();
    glRotatef(m_rotationAngle, 0, 0, 1);
    glScalef(m_scale, m_scale, m_scale);
    glVertexPointer(3, GL_FLOAT, stride, pCoords);
    glColorPointer(4, GL_FLOAT, stride,  pColors);
    glEnableClientState(GL_VERTEX_ARRAY);

    const GLvoid* bodyIndices = &m_coneIndices[0];
    const GLvoid* diskIndices = &m_coneIndices[m_bodyIndexCount];

    glEnableClientState(GL_COLOR_ARRAY);
    glDrawElements(GL_TRIANGLES, m_bodyIndexCount, GL_UNSIGNED_BYTE, bodyIndices);
    glDisableClientState(GL_COLOR_ARRAY);
    glColor4f(1, 1, 1, 1);
    glDrawElements(GL_TRIANGLES, m_diskIndexCount, GL_UNSIGNED_BYTE, diskIndices);

    glDisableClientState(GL_VERTEX_ARRAY);
    glPopMatrix();
}
|
You should be able to build and run at this
point. Next, modify the ES 2.0 backend by making the same changes we just
went over. The only tricky part is the RenderExample 4. From a 30,000-foot
view, it basically does the same thing as its ES 1.1 counterpart, but with
some extra footwork at the beginning for setting up the transformation
state. method,
shown in
Example 4. RenderingEngine2::Render()
void RenderingEngine2::Render() const
{
    GLuint positionSlot = glGetAttribLocation(m_simpleProgram, "Position");
    GLuint colorSlot = glGetAttribLocation(m_simpleProgram, "SourceColor");

    mat4 rotation = mat4::Rotate(m_rotationAngle);
    mat4 scale = mat4::Scale(m_scale);
    mat4 translation = mat4::Translate(0, 0, -7);
    GLint modelviewUniform = glGetUniformLocation(m_simpleProgram, "Modelview");
    mat4 modelviewMatrix = scale * rotation * translation;

    GLsizei stride = sizeof(Vertex);
    const GLvoid* pCoords = &m_coneVertices[0].Position.x;
    const GLvoid* pColors = &m_coneVertices[0].Color.x;

    glClearColor(0.5f, 0.5f, 0.5f, 1);
    glClear(GL_COLOR_BUFFER_BIT | GL_DEPTH_BUFFER_BIT);
    glUniformMatrix4fv(modelviewUniform, 1, 0, modelviewMatrix.Pointer());
    glVertexAttribPointer(positionSlot, 3, GL_FLOAT, GL_FALSE, stride, pCoords);
    glVertexAttribPointer(colorSlot, 4, GL_FLOAT, GL_FALSE, stride, pColors);
    glEnableVertexAttribArray(positionSlot);

    const GLvoid* bodyIndices = &m_coneIndices[0];
    const GLvoid* diskIndices = &m_coneIndices[m_bodyIndexCount];

    glEnableVertexAttribArray(colorSlot);
    glDrawElements(GL_TRIANGLES, m_bodyIndexCount, GL_UNSIGNED_BYTE, bodyIndices);
    glDisableVertexAttribArray(colorSlot);
    glVertexAttrib4f(colorSlot, 1, 1, 1, 1);
    glDrawElements(GL_TRIANGLES, m_diskIndexCount, GL_UNSIGNED_BYTE, diskIndices);

    glDisableVertexAttribArray(positionSlot);
}
|
That covers the basics of index buffers; we
managed to reduce the memory footprint by about 28% over the nonindexed
approach. Optimizations like this don’t matter much for silly demo apps
like this one, but applying them to real-world apps can make a big
difference.